So, you’ve got a home improvement project on your hands and you’re wondering what’s the best way to apply caulk? Well, look no further, because in this article, we’ll be exploring the most effective techniques for applying caulk that will leave your project looking clean and professional. Whether you’re a seasoned DIY enthusiast or a first-timer, we’ll guide you through step by step, ensuring that you have all the knowledge and skills to tackle any caulking job with confidence. Get ready to discover the secrets to achieving smooth, precise, and long-lasting caulk lines that will make any DIY project shine.
Choosing the Right Caulk
Understanding Different Types of Caulk
When it comes to choosing the right caulk for your project, understanding the different types available is crucial. There are various types of caulk, each designed for specific purposes. Silicone caulk is durable and flexible, making it a great option for sealing gaps and joints around windows and doors. Acrylic latex caulk is water-based and easy to apply, making it ideal for interior projects. Polyurethane caulk is highly durable and great for outdoor use, as it can withstand harsh weather conditions. By understanding the properties of each type of caulk, you can select the one that best suits your needs.
Determining the Best Caulk for Your Project
To determine the best caulk for your project, consider the location and conditions the caulk will be exposed to. If you’re working on an exterior project, such as sealing gaps in siding or repairing a leaky roof, opt for a caulk that is specifically designed for outdoor use. If you’re caulking interior spaces like bathrooms or kitchens, where moisture is present, choose a caulk that is mold and mildew resistant. Additionally, consider the flexibility, paintability, and ease of use of different caulks, as these factors can impact the overall success of your project.
Preparing the Surface
Cleaning and Removing Old Caulk
Before applying new caulk, it’s essential to clean and remove any old caulk from the surface. Use a caulk remover tool or a utility knife to carefully scrape away the old caulk. Be thorough in this step, as any remaining caulk can affect the adhesion of the new caulk. After removing the old caulk, ensure that the surface is clean and free from dust, dirt, and debris. Wipe it down with a damp cloth or use a mild detergent if necessary.
Repairing Any Damage
If there is any damage to the surface, such as cracks or gaps, it’s important to repair them before applying caulk. Fill in any cracks or gaps with a suitable filler or patching compound and allow it to dry completely. This step ensures a smooth and even surface for the caulk to adhere to.
Smoothing the Surface
To achieve a professional-looking finish, it’s crucial to smooth the surface before applying caulk. Use fine sandpaper or a sanding block to gently smooth any rough edges or uneven surfaces. This step will help the caulk adhere better and create a seamless finish once it’s applied.
Gathering the Necessary Tools
Caulking Gun
A caulking gun is a must-have tool for applying caulk. It allows for controlled and precise application, ensuring uniform distribution of the caulk. Make sure to choose a caulking gun that is comfortable to hold and easy to use.
Caulk Strips or Tubes
Depending on the size of your project, you’ll need either caulk strips or caulk tubes. Caulk strips are convenient for smaller projects and can be easily cut to the desired length. Caulk tubes are ideal for larger projects and can be loaded into the caulking gun for continuous application.
Utility Knife
A utility knife is essential for removing old caulk, cutting caulk tubes or strips, and making precise cuts when necessary. Choose a utility knife with a sharp and retractable blade for safety and ease of use.
Painter’s Tape
Painter’s tape is a helpful tool for achieving clean and precise caulk lines. Use it to mask off areas adjacent to the caulking area, such as walls or trim, to ensure a neat finish. Make sure to remove the painter’s tape immediately after applying the caulk, before it dries, to prevent it from peeling the caulk away.
Caulk Finishing Tool
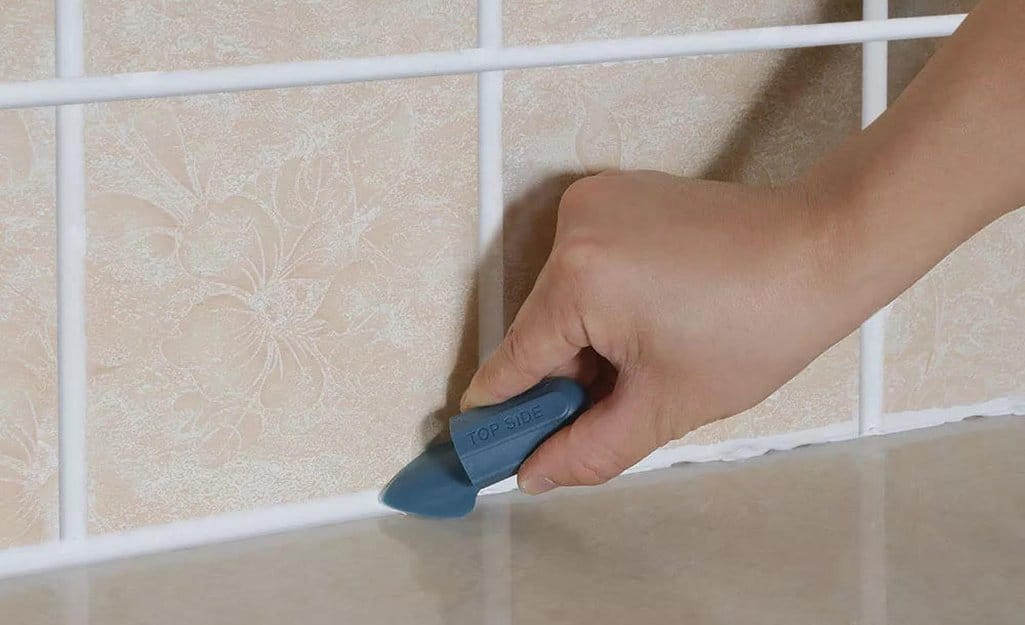
A caulk finishing toolhttps://thetoolcupboard.com/allway-ct31-caulk-tool-review/ is used to smooth and shape the applied caulk. It helps create a professional-looking finish by removing excess caulk and creating a smooth and even surface. Look for a caulk finishing tool with different shapes and sizes to suit various caulk lines and joint widths.
Applying Caulk
Cutting the Caulk Tube Nozzle
Before using the caulking gun, cut the nozzle of the caulk tube at a 45-degree angle. The size of the cut will determine the thickness of the bead of caulk being applied. Start with a smaller cut and gradually increase the size if a thicker bead is desired. Make sure to cut the nozzle small enough to fit the width of the joint or gap you are caulking.
Using the Caulking Gun
Load the caulk tube into the caulking gun and make sure it is securely in place. Hold the gun at a 45-degree angle to the surface and apply gentle pressure to the trigger. Slowly move the gun along the joint or gap, applying a steady flow of caulk. Maintain a consistent speed to ensure uniform application.
Applying the Bead of Caulk
As you move the caulking gun along the joint or gap, squeeze a continuous bead of caulk directly into the area being filled. Try to apply an even amount of caulk, filling the entire joint or gap without leaving any gaps or voids. Be mindful not to apply too much caulk, as excess caulk can be difficult to remove and may not adhere properly.
Working in Sections
If you’re caulking a long or continuous joint, it’s best to work in sections rather than attempting to caulk the entire area at once. This allows you to maintain control over the application and ensures proper adhesion. Start at one end of the joint and gradually work your way to the other, overlapping each section slightly to create a seamless finish.
Maintaining a Steady Hand
To achieve clean and straight caulk lines, it’s important to maintain a steady hand while applying caulk. Keep the caulking gun at a consistent angle and move it along the joint or gap smoothly and steadily. If necessary, practice on a scrap surface to get comfortable with the motion and pressure required.
Smoothing and Finishing
Using a Damp Finger or Sponge
Immediately after applying the caulk, use a damp finger or sponge to smooth the bead of caulk. Wetting your finger or sponge prevents the caulk from sticking to it and allows for a smoother finish. Gently run your finger or sponge along the caulk line, smoothing out any uneven areas or visible ridges.
Using a Caulk Finishing Tool
For a more precise finish, use a caulk finishing tool. This tool is designed to create a smooth and professional-looking caulk line. Hold the tool at a 45-degree angle and run it along the caulk line, applying light pressure. This will remove excess caulk and create a neat and tidy finish. Clean the tool regularly to prevent caulk from building up on it.
Removing Excess Caulk
If you notice any excess caulk or smudges, immediately remove them before the caulk dries. Use a damp cloth or sponge to carefully wipe away any unwanted caulk. Pay attention to corners and crevices where excess caulk may collect. Removing excess caulk while it’s still wet will result in a cleaner and more professional-looking finish.
Protecting the Caulk While it Dries
After applying caulk, it’s important to protect it while it dries. Avoid touching or disturbing the caulk for at least 24-48 hours, depending on the type of caulk used. This allows the caulk to fully cure and ensures optimal performance. Additionally, avoid exposing the caulk to water or extreme temperatures during the curing process, as it may affect its durability.
Curing and Drying Time
Understanding Caulk Curing Time
Caulk curing time refers to the time it takes for the caulk to fully dry and reach its maximum strength and adhesion. The exact curing time can vary depending on the type of caulk used, as well as the surrounding temperature and humidity levels. It’s important to refer to the manufacturer’s instructions for specific curing time guidelines.
Factors Affecting Drying Time
Several factors can affect the drying time of caulk. Higher temperatures and lower humidity levels generally result in faster drying times, while cooler temperatures and higher humidity levels can prolong the drying process. It’s crucial to consider the environmental conditions when applying caulk, as these factors can impact the overall success of your project.
Cleaning Up
Removing Painter’s Tape
Once the caulk has dried and cured, it’s time to remove the painter’s tape. Start by holding down the edge of the tape and gently pull it back at a 45-degree angle. This will help prevent the tape from peeling off any dried caulk. Discard the tape properly and inspect the caulk lines for any imperfections or touch-ups that may be needed.
Cleaning Tools and Hands
After completing your caulking project, it’s important to clean your tools and hands thoroughly. Use soap and water to clean caulk residue off your caulking gun, caulk finishing tool, and utility knife. Rinse them well and allow them to air dry before storing them for future use. Wash your hands with soap and water to remove any caulk or residue, and apply moisturizer to prevent dryness.
Tips and Tricks
Practicing on a Scrap Surface
If you’re new to caulking or trying a different technique, it’s always a good idea to practice on a scrap surface first. This allows you to refine your technique, determine the right amount of pressure to apply, and get comfortable with the tools and materials you’re using.
Using Backer Rods for Larger Gaps
For larger gaps or joints, consider using backer rods in conjunction with caulk. Backer rods are foam rods that are inserted into the gap before applying caulk. They provide support and fill in the extra space, allowing the caulk to adhere better and preventing it from cracking or shrinking.
Applying Multiple Thin Layers
Instead of applying a thick bead of caulk all at once, consider applying multiple thin layers. This technique ensures better adhesion and allows for easier smoothing and finishing. Apply one thin layer of caulk, smooth it out, and let it dry before applying another layer. Repeat this process until the desired results are achieved.
Taking Breaks to Assess Your Work
Caulking can be a time-consuming and meticulous task. To ensure you’re achieving the desired results, take breaks to step back and assess your work. This allows you to identify any areas that may need touch-ups or adjustments. Giving your eyes and hands a break also helps maintain a steady hand and improves the overall quality of your caulk application.
Common Mistakes to Avoid
Skipping Surface Preparation
Skipping surface preparation is a common mistake that can lead to poor adhesion and ineffective sealing. Always make sure to clean and prepare the surface properly before applying caulk. This includes removing old caulk, repairing any damage, and smoothing the surface for optimal results.
Using the Wrong Type of Caulk
Using the wrong type of caulk for your project can result in subpar performance and premature failure. Take the time to research and select the appropriate caulk for your specific needs. Consider the location, conditions, and desired properties of the caulk to ensure a successful and long-lasting seal.
Leaving Gaps and Incomplete Seals
Leaving gaps or incomplete seals is another common mistake that can compromise the effectiveness of your caulk application. Always ensure that the caulk fully fills the joint or gap, leaving no voids or openings. Properly sealing the area prevents water intrusion, drafts, and other potential issues.
Applying Too Much Pressure
Applying too much pressure while caulking can lead to an uneven distribution of caulk and messy results. Use a steady and controlled hand when using the caulking gun to apply consistent pressure. Avoid squeezing the trigger too hard, as it can cause excessive caulk to be dispensed, leading to waste and potential cleanup challenges.
Troubleshooting
Removing Excess or Unwanted Caulk
If you find excess or unwanted caulk after it has dried, there are several methods to remove it. Use a utility knife or razor blade to carefully cut away any excess caulk. Alternatively, a caulk remover tool or solvent can be used to soften and remove dried caulk. Follow the manufacturer’s instructions for the specific product being used.
Repairing and Patching Mistakes
If you discover any mistakes or imperfections in your caulk application, don’t panic. Most caulk types can be repaired or patched. Use a caulk remover tool or utility knife to remove the faulty caulk, and then clean and prepare the surface again. Apply a new layer of caulk, ensuring proper coverage and adhesion. Smooth and finish as necessary for a seamless finish.


